Wednesday, 20 January 2016

Friday, 19 September 2014
.gif)
Sunday, 14 September 2014
How To Check If Someone Is Using Your WiFi!
There are many reasons why you'd want to check if an unauthorized
party is using your wireless network. It may be that you're experiencing
a slower than normal Internet connection or you simply don't want
anyone getting a free ride while you pay the bill. Of course, there are
also security implications if this person can somehow access files on
your network, and even legal implications if he uses your connection for
piracy or other illicit activities.
Whatever the case it's better to stay on the safe side. Many of you may have already taken some basic precautions when setting up your wireless network and know your way around troubleshooting these issues. This brief guide is aimed mostly at novice users in need a hand to find out if, indeed, their Wi-Fi is being stolen.
Alternatively, if you are on a Mac, you can find the default address by going to Network under System Preferences. It should be listed right next to "Router:" if you are using Ethernet, or by clicking on "Advanced…" and heading to the "TCP/IP" tab if you are using Wi-Fi. Next, point your browser to that address and enter your login details -- if you haven't changed the default settings it should be a combination of "admin" and "password" or blank fields. Here's a default username and password list (PDF) you might find useful, but we recommend you change this afterwards.
Once inside your router's administrative console look for a section related to connected devices or wireless status. In my old DIR-655 from D-Link it's available under Status > Wireless but you'll find it as "Attached Devices" in Netgear routers, under DHCP Clients Table on Linksys routers, "Device List" if you are using the Tomato firmware, and so on.
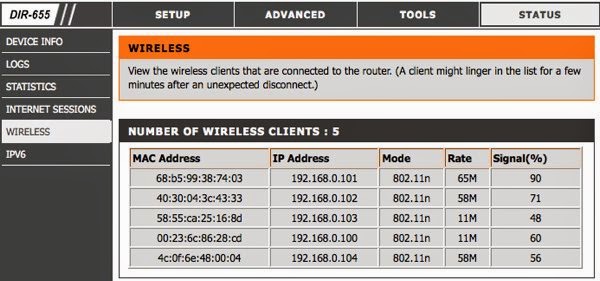
 This should provide a table with the IP, MAC address and other
details of every device currently connected to the router. Check that
list against your gear to find any intruders. You can find out the
MAC/IP address of your computers by going to the Command Prompt again
and entering 'ipconfig /all'. The MAC address will be shown as the
physical address. I'll let you figure it out for mobile devices like
smartphones and media players since I can't possibly list all options.
This should provide a table with the IP, MAC address and other
details of every device currently connected to the router. Check that
list against your gear to find any intruders. You can find out the
MAC/IP address of your computers by going to the Command Prompt again
and entering 'ipconfig /all'. The MAC address will be shown as the
physical address. I'll let you figure it out for mobile devices like
smartphones and media players since I can't possibly list all options.
That should be more than enough for most users but if you need to actually track down who's been breaking into your network it's possible to pinpoint his physical location using a tool called MoocherHunter. You'll need to burn a Live CD to boot your laptop with and walk around to track down unauthorized wireless clients. According to the program's description, it detects traffic sent across the network and can find the source within 2 meters accuracy.
Needless to say, we're not suggesting you take matters into your own hands, but it might come in handy if someone is getting you in trouble with authorities using your network for illegal purposes -- or simply to have a cool story to tell.
Whatever the case it's better to stay on the safe side. Many of you may have already taken some basic precautions when setting up your wireless network and know your way around troubleshooting these issues. This brief guide is aimed mostly at novice users in need a hand to find out if, indeed, their Wi-Fi is being stolen.
Check the devices associated with your router
The first thing you need to do is login to your router's administrative console by typing its IP address directly into the browser address bar -- typically 192.168.0.1 or 192.168.1.1 depending on which router you have. If you don't know your router's default address check out this guide or simply go to the command prompt (Start > Run/Search for cmd) and enter ipconfig. The address you need should be next to Default Gateway under your Local Area Connection.Alternatively, if you are on a Mac, you can find the default address by going to Network under System Preferences. It should be listed right next to "Router:" if you are using Ethernet, or by clicking on "Advanced…" and heading to the "TCP/IP" tab if you are using Wi-Fi. Next, point your browser to that address and enter your login details -- if you haven't changed the default settings it should be a combination of "admin" and "password" or blank fields. Here's a default username and password list (PDF) you might find useful, but we recommend you change this afterwards.
Once inside your router's administrative console look for a section related to connected devices or wireless status. In my old DIR-655 from D-Link it's available under Status > Wireless but you'll find it as "Attached Devices" in Netgear routers, under DHCP Clients Table on Linksys routers, "Device List" if you are using the Tomato firmware, and so on.
Taking action
The best and simplest solution is to set up a strong password using WPA2 or WPA -- WEP is very easy to crack so avoid that if possible. There are some other methods you can use to beef up security, like switching off the SSID broadcast (which prevents it from advertising the name of your network to nearby Wi-Fi devices) or setup a filter for allowed or blocked devices by MAC address. It won't stop the most determined intruder but it will slow him down.That should be more than enough for most users but if you need to actually track down who's been breaking into your network it's possible to pinpoint his physical location using a tool called MoocherHunter. You'll need to burn a Live CD to boot your laptop with and walk around to track down unauthorized wireless clients. According to the program's description, it detects traffic sent across the network and can find the source within 2 meters accuracy.
Needless to say, we're not suggesting you take matters into your own hands, but it might come in handy if someone is getting you in trouble with authorities using your network for illegal purposes -- or simply to have a cool story to tell.
Bonus: Profit by setting up a paid Wi-Fi hotspot
If it doesn't bother you to have someone piggybacking on your connection you might as well get something in return, right? Chillifire is a good third-party firmware alternative if you want to run a public hotspot, as it allows you to offer for-pay or free Internet access points from your consumer router. Alternatively, you can get a Fonera router, which gives you free roaming at Fon Spots worldwide in return for sharing a little bit of your WiFi at home.Thursday, 11 September 2014
Install Windows 7 from a USB drive the very easy way/Make USB BOOTABLE!
The fastest way to install windows 7 is from a bootable usb drive. You can cut the install time down to around 15 minutes compared with 30-40 via DVD if you use a fast drive.
People still asking me to explain what is the best way to do this as many of the guides online are too complex, or require third party software which doesn’t always work as they supposed to.
With this BootableUSB guide all you need to ensure is that your motherboard supports USB booting, and this is a common feature now for most of the computers.
Today I am going to publish a step by step guide which works perfectly and doesn’t require any additional tools – I have been doing it for some time now to create bootable Windows install drives.
You need to get hold of a fast USB 2.0 flash drive. It doesn’t need to be 32GB or bigger,however, all you need is a 4GB unit. The faster it is, the better.
What you need:
– Windows 7 DVD install disc or ISO image
– USB Drive (4GB+ and as fast as you can get)
– Running Windows Operating system
– Working set of hands and eyes
– A few minutes of your life
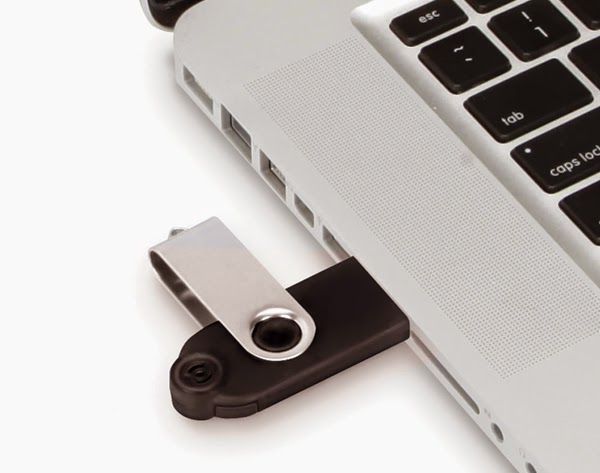
Plug in your USB drive in the USB port:
Open your ‘My Computer’ and make a note of the drive numbers of both the USB drive and the DVD drive with Windows 7 files on it.

As you can see from the image above, the DVD drive is drive has letter D assigned and the USB drive is E.
Open the command prompt with admin rights. Type cmd in Start menu search box and hit Shift+Ctrl+Enter.
To keep things really easy, if you see text in upper case, it means this is what you type into the command prompt (you don’t need to type in upper case).
 Next type
DISKPART
this loads the diskpart application we need to proceed
Then type
LIST DISK
the image above shows our 32 GB USB drive is listed as DISK 2
so you have to type
SELECT DISK 2 (your USB Drive may have a different number, don’t follow exactly this text it depends on your usb drive)
You will get a successful response “Disk 2 is now the selected disk”
 Next we want to clean the USB drive
Type:
CLEAN
you will get a successful response ‘DiskPart succeeded in cleaning the disk”.
 After the
drive is cleaned follow the list in the image above (detailed below in
list order) – you can also note the successful text responses from the
OS as you enter each command.
After the
drive is cleaned follow the list in the image above (detailed below in
list order) – you can also note the successful text responses from the
OS as you enter each command.
SELECT DISK 2 (or what number your USB drive has)
CREATE PARTITION PRIMARY
SELECT PARTITION 1
ACTIVE
FORMAT FS=NTFS
Formatting can take a little time depending on the size of the drive, our 32GB unit took about 10 minutes to format - you will see a percentage readout until it is finished.
 Next type:
ASSIGN
EXIT (DISK PART will exit)
Type D: CD BOOT (substitute the “D” if necessary with the letter of your Windows 7 DVD drive)
then key
CD BOOT
then
BOOTSECT.EXE /NT60 E: (substitute the “E” if necessary with the letter of your now ready USB drive) – we are telling the system to create a boot sector file on the USB drive.
Now you can exit the command prompt and copy all the files on the Windows 7 DVD to the USB drive.
Once this step is finished you’ll be ready to boot from this drive, all you need to do is configure your motherboard bios setup to boot first from USB rather than hard drive or optical drive. If you don’t know how to do this, refer to your specific motherboard manual or search the internet.
Now, Windows 7 installation should take between 40% and 60% of the time it does from the DVD disc.
People still asking me to explain what is the best way to do this as many of the guides online are too complex, or require third party software which doesn’t always work as they supposed to.
With this BootableUSB guide all you need to ensure is that your motherboard supports USB booting, and this is a common feature now for most of the computers.
Today I am going to publish a step by step guide which works perfectly and doesn’t require any additional tools – I have been doing it for some time now to create bootable Windows install drives.
You need to get hold of a fast USB 2.0 flash drive. It doesn’t need to be 32GB or bigger,however, all you need is a 4GB unit. The faster it is, the better.
What you need:
– Windows 7 DVD install disc or ISO image
– USB Drive (4GB+ and as fast as you can get)
– Running Windows Operating system
– Working set of hands and eyes
– A few minutes of your life
Plug in your USB drive in the USB port:
Before going any further, make sure you have removed any important files on your drive to a safe location, what we are about to do next is to erase the entire contents of the drive.
Insert your DVD of Windows 7 into the computer, but don’t start the normal install process.Open your ‘My Computer’ and make a note of the drive numbers of both the USB drive and the DVD drive with Windows 7 files on it.
As you can see from the image above, the DVD drive is drive has letter D assigned and the USB drive is E.
Open the command prompt with admin rights. Type cmd in Start menu search box and hit Shift+Ctrl+Enter.
To keep things really easy, if you see text in upper case, it means this is what you type into the command prompt (you don’t need to type in upper case).
DISKPART
this loads the diskpart application we need to proceed
Then type
LIST DISK
the image above shows our 32 GB USB drive is listed as DISK 2
so you have to type
SELECT DISK 2 (your USB Drive may have a different number, don’t follow exactly this text it depends on your usb drive)
You will get a successful response “Disk 2 is now the selected disk”
Type:
CLEAN
you will get a successful response ‘DiskPart succeeded in cleaning the disk”.
SELECT DISK 2 (or what number your USB drive has)
CREATE PARTITION PRIMARY
SELECT PARTITION 1
ACTIVE
FORMAT FS=NTFS
Formatting can take a little time depending on the size of the drive, our 32GB unit took about 10 minutes to format - you will see a percentage readout until it is finished.
ASSIGN
EXIT (DISK PART will exit)
Type D: CD BOOT (substitute the “D” if necessary with the letter of your Windows 7 DVD drive)
then key
CD BOOT
then
BOOTSECT.EXE /NT60 E: (substitute the “E” if necessary with the letter of your now ready USB drive) – we are telling the system to create a boot sector file on the USB drive.
Now you can exit the command prompt and copy all the files on the Windows 7 DVD to the USB drive.
Once this step is finished you’ll be ready to boot from this drive, all you need to do is configure your motherboard bios setup to boot first from USB rather than hard drive or optical drive. If you don’t know how to do this, refer to your specific motherboard manual or search the internet.
Now, Windows 7 installation should take between 40% and 60% of the time it does from the DVD disc.
Wednesday, 21 May 2014

Monday, 3 March 2014
INPAGE 2014

DOWNLOAD HERE!
link 1
link 2
Friday, 28 February 2014
How To Reformat a Bootable ESXi USB Flash Drive

- From Command prompt type ‘diskpart‘
- type ‘list disk‘
- it should then look something like this:
DISKPART> list disk
Disk ### Status Size Free Dyn Gpt
——– ————- ——- ——- — —
Disk 0 Online 247 GB 1024 KB
Disk 1 Online 186 GB 0 B
Disk 2 Online 7 GB 0 B
4. Once we see which Disk is your USB drive, you will want to type ‘select disk‘ (change “disk 2″ to the number of your drive):
5. DISKPART> select disk 2
Disk 2 is now the selected disk.
6. DISKPART> clean
DiskPart succeeded in cleaning the disk.
7. DISKPART> create partition primary
DiskPart succeeded in creating the specified partition.
8. DISKPART> select partition 1
Partition 1 is now the selected partition.
9. DISKPART> active
DiskPart marked the current partition as active.
10. DISKPART> format fs=ntfs quick
100 percent completed
DiskPart successfully formatted the volume.
11. DISKPART> assign
DiskPart successfully assigned the drive letter or mount point.
COMPLETE!
so that might seem like a lot of steps but in all reality, the whole process will take only a few minutes to execute.
Enjoy
Subscribe to:
Comments (Atom)